How-To Adjust A Pilot Unloader Valve
This short video shows how to adjust a pilot unloader valve.
Pilot Valve Adjustments (Step 1)
Setting the pilot valve from scratch.
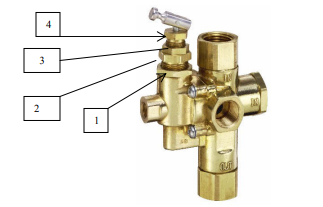
Using the diagram above:
- Differential locknut
- Differential screw
- Pressure screw locknut
- Pressure screw
Turn the compressor off.
- Loosen the differential locknut (1). Then turn the differential screw (2) clockwise until you feel the pilot seat come to rest on the internal ball.
- Gently turn the differential screw a little more in the clockwise direction after coming in contact with the ball (this seats the valve) and then secure the differential locknut (1).
- Loosen the pressure screw locknut (3) and turn the pressure screw (4) counterclockwise to remove it from the adjustment.
- Cycle the compressor to the desired minimum setting (load pressure) and turn off the compressor. Loosen the differential locknut (1) and turn the differential screw ¼ turn in the counterclockwise direction. Snug differential locknut (1).
- Begin to screw the pressure screw (4) back into place slowly. When air extinguishes out the top of the valve, you have established your bottom pressure setting. Secure the locknut (3).
- Cycle the compressor up and down making a note of your minimum pressure setting. If it is too high, turn the pressure screw (4) counterclockwise. If the minimum setting is too low, turn the pressure screw (4) clockwise.
- Repeat until the desired setting is achieved. LOW END PRESSURE MUST BE SET FIRST!
- Then, cycle the compressor and make note of the maximum pressure setting. If it is too high, turn the differential screw (2) counterclockwise. If the maximum setting is too low, turn the differential screw clockwise*.
- Repeat until desired setting is achieved. Make sure all locknuts are secure and operate compressor as normal.
* When turning the differential screw clockwise, make sure not to overturn it. This could cause the pilot seat to rest on the ball and stop the valve’s ability to unload.
(If the setting you are attempting to achieve is vastly different from the original factory setting, the valve may require an internal components change.)
(Step 2)
Fine tuning the pilot valve setting.
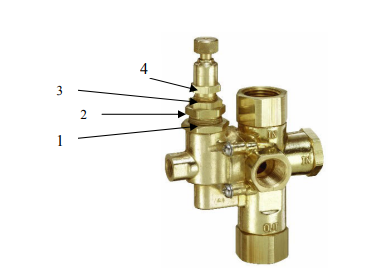
Using the diagram below:
4. Differential locknut
5. Differential screw
6. Pressure screw locknut
7. Pressure screw
- Cycle the compressor and make note of the maximum and minimum settings.
- Turn the compressor off.
- The bottom end pressure (minimum setting) must be set first!
- Loosen the pressure screw locknut (3) and turn the pressure screw (4) counterclockwise to decrease the minimum pressure setting or clockwise to increase. Secure the locknut and cycle the compressor to see if the correct minimum pressure setting was achieved.
- Repeat the above until you have achieved the desired minimum setting. Make sure locknut is secured.
- Once the minimum pressure is set, the top end (maximum pressure) can be adjusted.
- Cycle the compressor and locate where the maximum pressure is set.
- Turn the compressor off.
- Loosen the differential locknut (1) and turn the differential screw (2) counterclockwise to decrease the maximum pressure setting or clockwise to increase*. Secure the locknut after adjusting and cycle the compressor to see if the correct maximum pressure setting was achieved.
- Repeat the above until you have achieved the desired maximum setting. Make sure locknut is secured.
* When turning the differential screw clockwise, be sure not to overturn it. This could cause the pilot seat to rest on the ball and stop the valve’s ability to unload.
If the setting you are attempting to achieve is vastly different from the original factory setting, the valve may require an internal components change.